


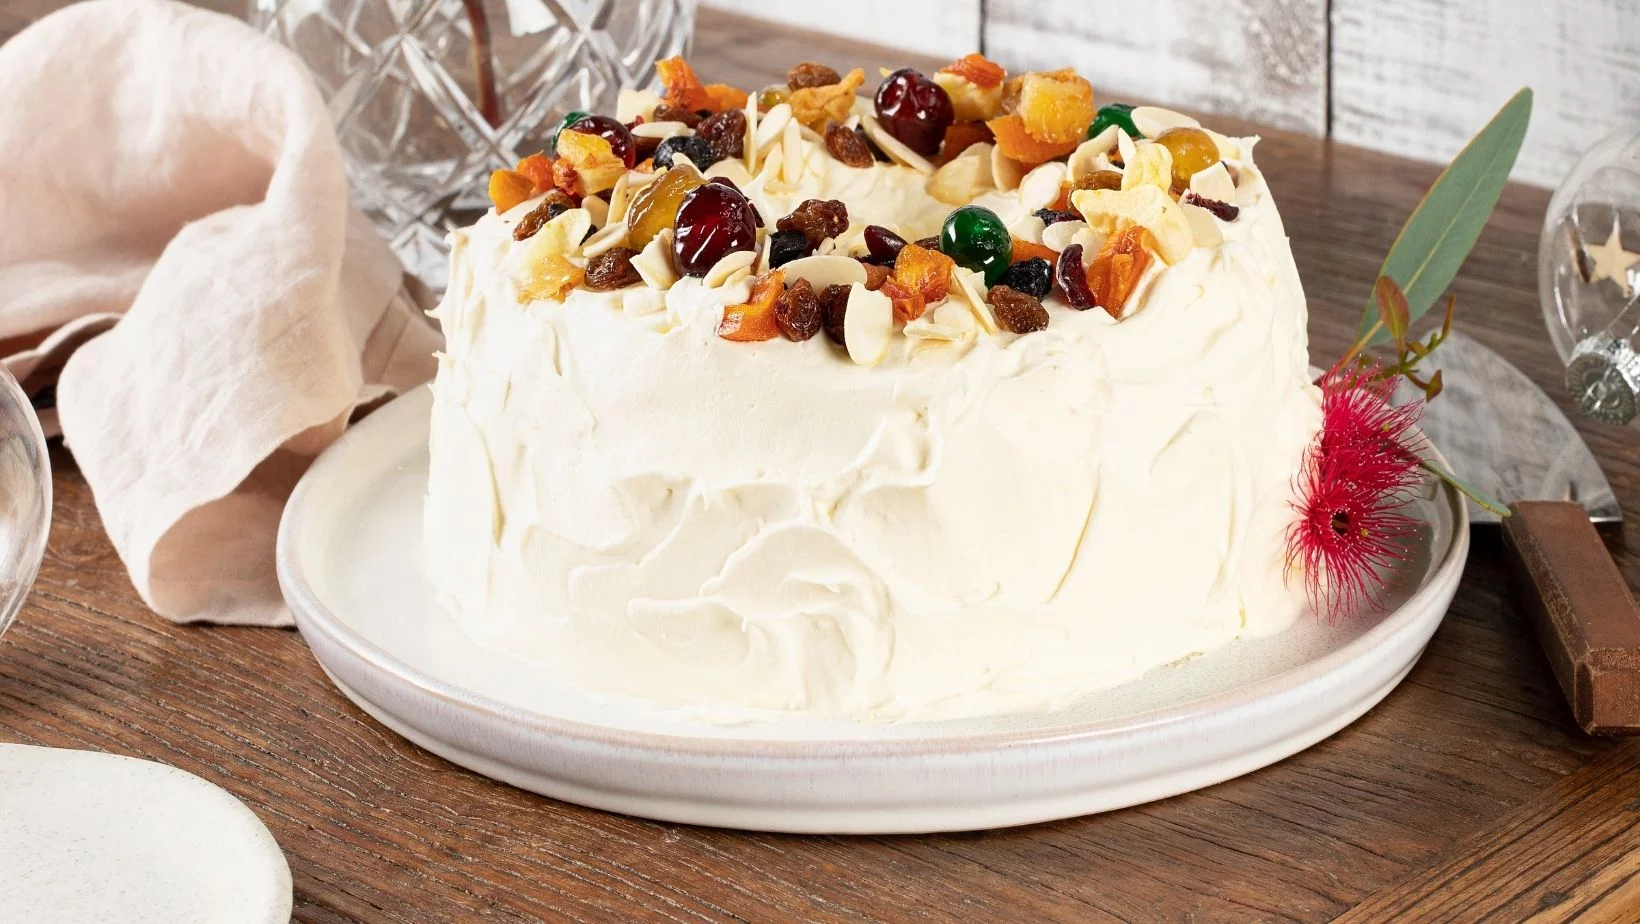
Chocolate Ripple Christmas Wreath
Preparation 15 MINS + overnight refrigeration
Cook
Serves 8
Method
You will need to begin this recipe the night before
Whip the cream to soft peaks.
Spread a few tablespoons of whipped cream onto the base of a 26-28cm round serving plate. This will stop your wreath from sliding around.
Dollop 1 flat tbsp of whipped cream onto a biscuit and top with another biscuit. Repeat until you have a stack of 5 biscuits, the top biscuit should not have any cream on top.
Repeat to make 8 stacks of biscuits.
On the prepared serving plate, arrange the biscuit stacks into a wreath shape. Spread the entire biscuit wreath with just enough whipped cream to ensure the biscuits are covered on top and around the sides. Refrigerate overnight, reserving remaining whipped cream.
When ready to serve, spread remaining whipped cream around the wreath. Decorate with dried fruit and nuts.
Ingredients
1L thickened cream
40 Chocolate Ripple biscuits (you will need two packets)
To decorate:
Sunbeam Sultanas
Sunbeam Multi Glacé Cherries
Sunbeam Flaked Almonds
Angas Park Fruit Medley
Angas Park Cranberries
Angas Park Blueberries,
Recipe Collection
Sticky Date Christmas Pudding with Salted Caramel Sauce
TO MAKE THE PUDDING
1. Combine dates, mixed fruit, 280ml water, sugars, salt and butter in large saucepan. Bring to the boil then reduce heat and allow to simmer for 8 mins.
2. Add bicarbonate of soda, stir well and allow to cool completely (preferably overnight).
3. Once completely cool, add eggs, flours, spices and rum. Mix well.
4. Generously grease inside the pudding bowl. Pour the mixture into tin then cover with a layer of baking paper and a layer of foil and secure tightly with kitchen string.
5. Place a small cooling rack or an upturned oven-safe dish into the base of a large saucepan. Place pudding bowl on top so that it is not directly touching the bottom of the pan. Fill saucepan with boiling water to come half way up the sides of the pudding bowl. Bring water to the boil then reduce heat to low, cover and allow to simmer for 3 hours. Remove pudding from water, allow to cool completely before removing pudding from tin.
TO MAKE SAUCE
1. Combine cream, butter and sugar in a saucepan. Stir over a low heat until all ingredients combined.
2. Stir in salt.
Roasted Peach Parfait with Gingerbread Granola
For the granola
Preheat the oven to 180℃.
In a large bowl, add all of the ingredients and mix well with a wooden spoon until all well combined.
Spread the mixture across 2 large baking trays lined with baking paper. Place into the oven and bake for 20-25 minutes, tossing the granola after 10 minutes.
Remove from the oven and allow granola to cool completely before storing in airtight containers, or jars.
Notes
Granola will store in an airtight container or jar for up to 2 weeks.
For the Peaches
Preheat the oven to 180℃.
Place peach quarters into a baking dish, sprinkle over the coconut sugar, ginger and drizzle over the vanilla and lemon juice. Toss gently, then place into the oven for 15 minutes, or until just tender.
Meanwhile, make the Mascarpone Cream. Place the cream into a stand mixer and whip for until fluffy and stiff peaks form. Add the mascarpone and whip again until combined. Add in the sugar and whip again.
To assemble Parfaits, layer the Marscapone Cream and Roasted Peaches. Garnish with the Gingerbread Granola and coconut flakes. Repeat for another layer.
Chocolate Bark Variations
Place the chocolate in a large heat-proof bowl over a pot of gently simmering water. Cook until the chocolate is almost entirely melted, stirring frequently.
Cover a large, rimmed baking sheet with parchment paper. Use a silicone or rubber spatula to spread chocolate evenly over the centre area of the baking sheet—aim for about ¼″ thickness
Sprinkle the nuts, seeds & fruit evenly over the chocolate. Lightly use your palms to press the toppings into the chocolate.
Place the pan on a flat surface in the refrigerator to set.
Once the chocolate is completely hardened, use your hands to break it into about 25 pieces. Serve immediately, or cover and store at room temperature for up to 1 week.
Chocolate Hazelnut Pudding
- Place raisins, sultanas and rum in a bowl and set to one side.
- Cream butter and brown sugar, until light and fluffy. Beat in eggs one at a time beating well after each addition.
- Sift flour, mixed spice and cinnamon. Add breadcrumbs, hazelnuts, chocolate, buttermilk, rum soaked fruit and butter mixture and mix well to combine.
- Spray 1.7L pudding bowl with oil and line base with baking paper. Spoon mixture into bowl and top with baking paper round and lid. Place a wire rack onto the base of a large saucepan, fill with water and bring to the boil. Carefully place pudding onto rack making sure the water comes about halfway up the basin. Cover and simmer for 3 hours, topping up water when needed.
- Remove from saucepan; stand for 10 minutes, before turning out.
Tip: This pudding can also be cooked in the microwave. Ensure your pudding bowl is microwave safe, cook in microwave on defrost setting for 30 minutes, check if a skewer inserted into pudding comes out clean. If not cooked, microwave at 5 minute intervals, until skewer comes out clean. Stand for 10 minutes before turning out.
Carrot & Sultana Cake
Preheat oven to 180C. Grease and line two 20cm cake tins.
In a large bowl, sift the flour, baking powder, bicarb, spices and salt. Stir to combine.
In a stand mixer, beat the eggs, sugars, oil and vanilla until smooth. Add half of the flour mix and mix on low speed until combined. Add remaining flour mix and mix on low speed again until all of the flour is incorporated. Add the pineapple and sultanas. Stir with a wooden spoon to combine.
Divide evenly between the prepared tins and bake for 40 mins or until cooked. Rotate the cakes after 20 mins. (You can test with a skewer, and the cake is ready when the skewer comes out clean.)
Cool the cakes in the pans for 10 mins, then transfer to cooling racks and leave until cooled.
Meanwhile, prepare the icing.
In a stand mixer, beat the butter on medium speed until very pale and creamy, about 4 mins. Add half of the sifted icing sugar and beat on low speed for about 1 min. Increase speed to medium to combine. Add remaining icing sugar and reduce speed to low for a further minute, then increase to medium speed for another few minutes until all of the icing sugar is combined. Add the vanilla and 1 tablespoon of the milk. Beat for 1 minute or until combined. Add extra tablespoon of milk of you would like a thinner frosting.
Divide the frosting between the centre of the cakes, reserving the remainder for the top and the sides.
Decorate with topping of choice.
Almond Star Bread
Preheat the oven to 180℃.
To make the Spiced Almond Cream: place butter and sugar into a stand mixer bowl. Mix for 2 minutes, until smooth. Slowly add the whisked eggs, salt and vanilla and mix again to incorporate. Fold in the almond meal and cinnamon and fold through with a wooden spoon to incorporate.
Slice each piece of puff pastry into 4 x 25cm circles.
Place one dough circle onto a piece of baking paper and spread 1 tablespoon of the Spiced Almond Cream evenly over the top. Stack the next dough circle on top and repeat with more Spiced Almond Cream. Repeat again with the final two dough circles.
Place a round object, about 7-8cm wide into the centre of the circle and make an indent, which becomes the centre of the star.
Cut the dough into 16 evenly spaced strips, starting from the indent to the edge of the dough. Take two strips next to each other and roll them away from each other. Press the two ends together to join. Repeat with the remaining 14 strips until each are twisted and paired up.
Transfer the star on the baking paper to a large baking tray. Brush with egg water wash and sprinkle over the flaked almonds. Place into the oven and bake for 25 minutes until puffed up and golden brown.
Remove from the oven, allow to cool and then dust with icing sugar, to serve.